README
Tue, 18 Feb. 2020 12:13 PM
Ruuvi-mqtt-gateway Box (Raspberry Pi)
First you need a Raspberry Pi with a recent version of Raspbian or Raspbian Lite installed. You can buy a Raspberry Pi 3 Model B here
I generally use headless systems so everything I outline here will use the command line. Here’s a complete guide to setting up a headless installation of Raspbian Lite.
If you’re working on a GUI installation, just open Terminal and follow the instructions.
1. Install the mosquitto MQTT Broker
mosquitto is a popular MQTT broker that is well-supported on Debian-based Linux platforms such as Raspbian. It’s easy to install using apt:-
sudo apt install mosquitto
You’ll need to enter your password the first time you run sudo.
You don’t strictly need the mosquitto-clients package for running the broker, but installing it allows you to run the MQTT client code locally which is great for testing.
It also means you can use the Raspberry Pi as a proper MQTT client as well as a broker. This means you could, for example, add a user interface to control other MQTT clients around your home directly from the Raspberry Pi.
to set up mosquitto the manual is: https://mosquitto.org/man/mosquitto-conf-5.html
2. Enable MQTT over Websocket
edit the configuration /etc/mosquitto/conf.d/enablews.conf
file contains:
user mosquitto
bind_address 0.0.0.0
port 1883
protocol mqtt
listener 9001 0.0.0.0
protocol websockets
Using Websockets over TLS (SSL) (not used so far)
To use websockets over TLS you need to configure the broker to use TLS.
See this tutorial Mosquitto SSL Configuration -MQTT TLS Security.
Now we edit our** mosquitto.conf** file. It should look like this:
3. Settings for Broker Bridging
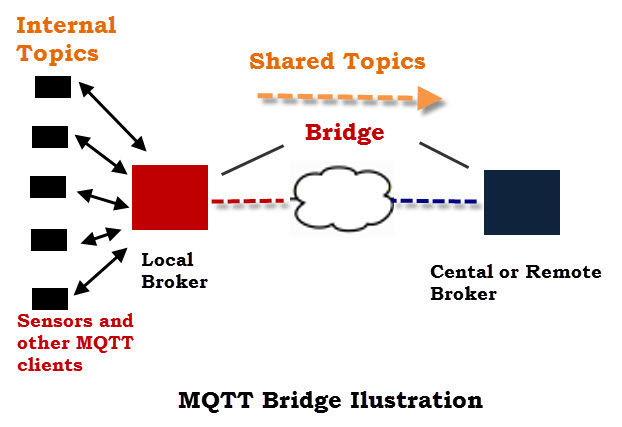
The Mosquitto broker (server) can be configured to work as an MQTT bridge. A bridge lets you connect two MQTT brokers together. They are generally used for sharing messages between systems. A common usage is to connect edge MQTT brokers to a central or remote MQTT network.
Generally, the local edge bridge will only bridge a subset of the local MQTT traffic.

again edit the configuration /etc/mosquitto/conf.d/enablews.conf
adding following lines:
# External MQTT Broker connection external-bridge addresstopic # in remote_username remote_password
The important additions are:
- connection: defines the start of a bridged connection
- address: configures the IP address of the MQTT broker to bridge to
- topic: defines the topic patterns to be shared between the brokers. For this setup, we are subscribing to all topics on the external server, but we are not sharing our local messages with the external server. See the Mosquitto documentation for more information.
- remote_username and remote_password:if you set up a username and password on your external broker put them here to authenticate
4. Enable the mosquitto broker
Enable the broker and allow it to auto-start after reboot using the following command:-
sudo systemctl enable mosquitto
The broker should now be running. You can confirm by checking the systemd service status:-
sudo systemctl status mosquitto
This should produce an output similar to:-
● mosquitto.service - LSB: mosquitto MQTT v3.1 message broker
   Loaded: loaded (/etc/init.d/mosquitto; generated; vendor preset: enabled)
   Active: active (running) since Sat 2018-12-29 16:27:56 GMT; 22h ago
     Docs: man:systemd-sysv-generator(8)
   CGroup: /system.slice/mosquitto.service
           └─1685 /usr/sbin/mosquitto -c /etc/mosquitto/mosquitto.conf

Dec 29 16:27:56 raspberrypi systemd[1]: Starting LSB: mosquitto MQTT v3.1 message broker...
Dec 29 16:27:56 raspberrypi mosquitto[1679]: Starting network daemon:: mosquitto.
Dec 29 16:27:56 raspberrypi systemd[1]: Started LSB: mosquitto MQTT v3.1 message broker.
5. MQTT Testing
5.1 Install the MQTT Client Package
Installing mosquitto MQTT Client on Linux
You can install the mosquitto client code using:-
apt update
sudo apt install mosquitto-clients
If your installation doesn’t yet support apt, replace it with apt-get.
5.2 Subscribe
mosquitto_sub -h localhost -t "test/message"
5.3 Subscribe Remotely
As before, you can now open another terminal in another workstation on the same network and type:-
mosquitto_sub -h raspberrypi -t "test/message"
5.4 Publish
mosquitto_pub -h localhost -t "test/message" -m "Hello World!"
you have to see on both Subscriber terminal Hello World!
6. May be usefull - Identify the Raspberry Pi on the Network
The MQTT client doesn’t need to know very much about the broker, but it does need to know where it is on the network. The MQTT client code needs a hostname or an IP address whenever you subscribe to or publish a message.
If your Raspberry Pi has a unique name on your network, it makes sense to use that. Find the host name on the Pi by typing:-
hostname
If yours is left at the default it will return:-
raspberrypi
I have too many Raspberry Pis on my network so I called mine mqtt-server to make it unique. If you want to do the same, the easiest way is via sudo raspi-config, but it does require a reboot.
Alternatively, you can always use the Raspberry Pi’s IP address in place of the hostname. An easy way to get this is by running:-
ifconfig | grep inet | grep cast
7. Installing forever and forever-service
sudo npm install -g forever
sudo npm install -g forever-service
8. Clone nodejs module from github
cd /home/pi/workspace
git clone https://github.com/tcafiero/ruuvi-mqtt-gateway.git
cd ruuvi-mqtt-gateway
9. Make ruuvi-mqtt-gateway.js auto-start at boot time
pi@raspberrypi:~ $ sudo forever-service install ruuvi-mqtt-gateway -s /home/pi/workspace/ruuvi-mqtt-gateway/ruuvi-mqtt-gateway.js
forever-service.js version 0.5.11

Platform - Raspbian GNU/Linux 10 (buster)
ruuvi-mqtt-gateway provisioned successfully

Commands to interact with service ruuvi-mqtt-gateway
Start   - "sudo service ruuvi-mqtt-gateway start"
Stop    - "sudo service ruuvi-mqtt-gateway stop"
Status  - "sudo service ruuvi-mqtt-gateway status"
Restart - "sudo service ruuvi-mqtt-gateway restart"
pi@raspberrypi:~ $ sudo service ruuvi-mqtt-gateway start
