README
react-native-settings-list
A clean and highly customizable React Native implementation of a list of settings for a settings page.
Quick Access
Installation
Install the module with:
npm install react-native-settings-list --save
Usage
In your code, simply require/import the module:
import SettingsList from 'react-native-settings-list';
Top
New changes/additions
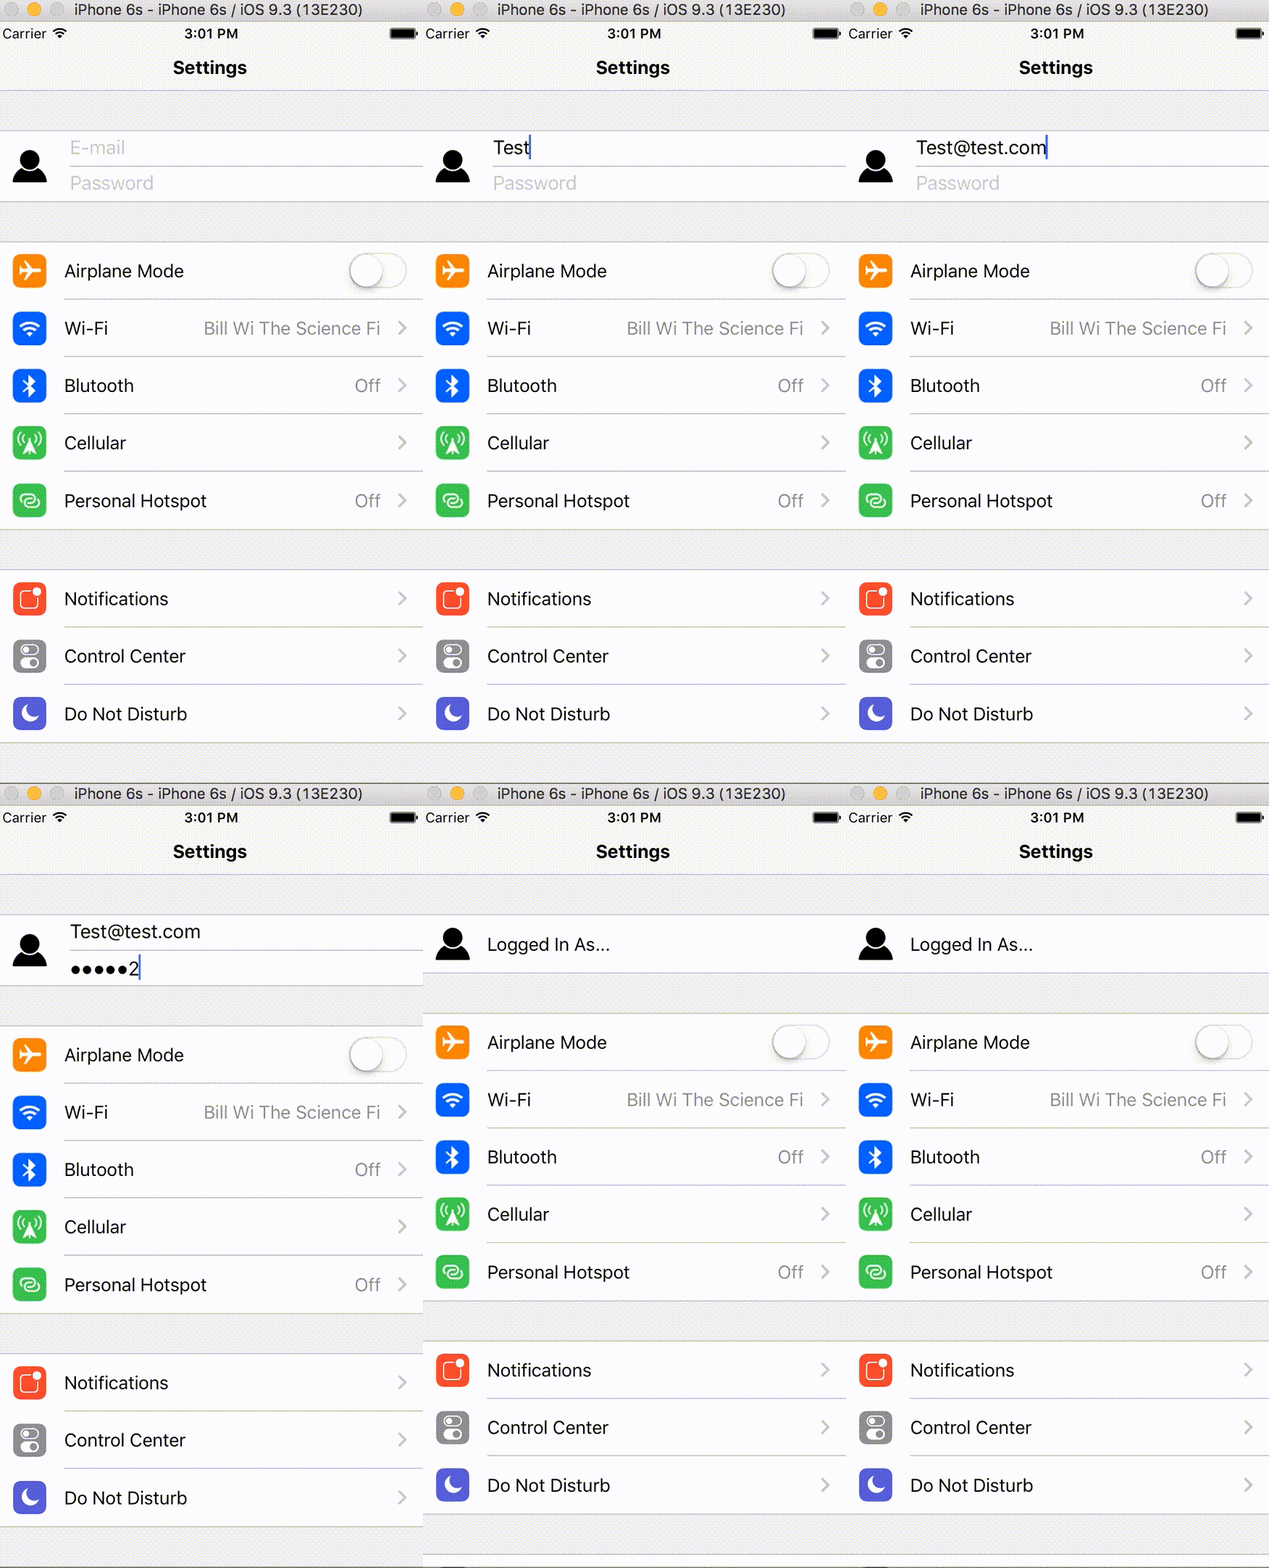
- Ability for an authorization-type component [example updated to show a practical use]
- Allows for complete customization of the TextInput by passing into the two props authPropsUser and authPassPW (overwrites defaults
- Uses existing onPress prop for callback
- Preview:

- Ability for custom arrow image/component
- Simply use the new arrowIcon prop to inject any type of object as the new arrow (with proper style formatting)
- Added defaultTitleStyle prop to <SettingsList> to set the style of the tiles for all children removing the need for duplicate code
Top
Contributing
Feel free to do pull requests if a certain feature you want is missing. I accept all PR's that are enhancements to the project.
Top
Prop values
<SettingsList>
The following props are used:
| Name | Description | Type |
|---|---|---|
| backgroundColor | Sets default background color for all children | React.PropTypes.string |
| borderColor | Sets default border color for all children | React.PropTypes.string |
| defaultItemSize | Sets default width for all children | React.PropTypes.number |
| underlayColor | Sets default underlayColor for all children | React.PropTypes.string |
| defaultTitleStyle | Sets default style for all children's titles | React.PropTypes.string |
<SettingsList.Header>
The following props are used:
| Name | Description | Type |
|---|---|---|
| headerText | Text for the header | React.PropTypes.string |
| headerStyle | Sets border color for the settings list | Text.propTypes.style |
| headerRef | Sets a ref on the header component |
React.PropTypes.func |
<SettingsList.Item>
The following props are used:
| Name | Description | Type |
|---|---|---|
| title | Text for the item | React.PropTypes.string |
| titleStyle | Text Style | Text.propTypes.style |
| icon | A component for the icon. Doesn't need to be an image | React.PropTypes.node |
| itemWidth | Changes the individual item's width. Overwrites <SettingsLists> defaultItemSize | React.PropTypes.number |
| backgroundColor | Changes the individual item's background color. Overwrites default <SettingsList> backgroundColor | React.PropTypes.string |
| underlayColor | Changes the individual item's underlayColor color. Overwrites default <SettingsList> underlayColor | React.PropTypes.string |
| onPress | On press Callback for item [used for auth callback as well] | React.PropTypes.func |
| hasNavArrow | Displays a navigation arrow | React.PropTypes.bool |
| arrowStyle | Style for the navigation arrow | Image.propTypes.style |
| arrowIcon | Inject custom arrow into the end of the item | React.PropTypes.node |
| hasSwitch | Enable a switch component | React.PropTypes.bool |
| switchProps | RN switch props | React.PropTypes.object |
| switchOnValueChange | On switches value change callback | React.PropTypes.func |
| titleInfo | Right side title information string | React.PropTypes.string |
| titleInfoStyle | Style for title information string | Text.propTypes.style |
| isAuth | Sets item as an authorization item | React.PropTypes.bool |
| authPropsUser | Changes the props for the first TextInput component; overwrites default | React.PropTypes.node |
| authPropsPW | Changes the props for the second TextInput component; overwrites default | React.PropTypes.node |
| itemRef | Sets a ref on the TouchableHighlight that SettingsList.Item renders to |
React.PropTypes.func |
Top
Simple Example
Here is a simple example of the different things you can do with the module:

The code behind it:
constructor(){
  super();
  this.onValueChange = this.onValueChange.bind(this);
  this.state = {switchValue: false};
}

render() {
  return (
    <View style={{backgroundColor:'gray',flex:1}}>
      <View style={{flex:1, marginTop:50}}>
        <SettingsList>
            <SettingsList.Header headerText='First Grouping' headerStyle={{color:'white'}}/>
          <SettingsList.Item
            icon={
              <View style={{height:30,marginLeft:10,alignSelf:'center'}}>
                <Image style={{alignSelf:'center',height:40, width:40}} source={require('./about.png')}/>
              </View>
            }
            itemWidth={50}
            title='Icon Example'
            onPress={() => Alert.alert('Icon Example Pressed')}
          />
          <SettingsList.Item
            hasNavArrow={false}
            switchState={this.state.switchValue}
            switchOnValueChange={this.onValueChange}
            hasSwitch={true}
            title='Switch Example'/>
          <SettingsList.Item
            title='Different Colors Example'
            backgroundColor='#D1D1D1'
            titleStyle={{color:'blue'}}
            arrowStyle={{tintColor:'blue'}}
            onPress={() => Alert.alert('Different Colors Example Pressed')}/>
          <SettingsList.Header headerText='Different Grouping' headerStyle={{color:'white', marginTop:50}}/>
          <SettingsList.Item titleInfo='Some Information' hasNavArrow={false} title='Information Example'/>
          <SettingsList.Item title='Settings 1'/>
          <SettingsList.Item title='Settings 2'/>
        </SettingsList>
      </View>
    </View>
  );
}

onValueChange(value){
  this.setState({switchValue: value});
}
Top
A more realistic example
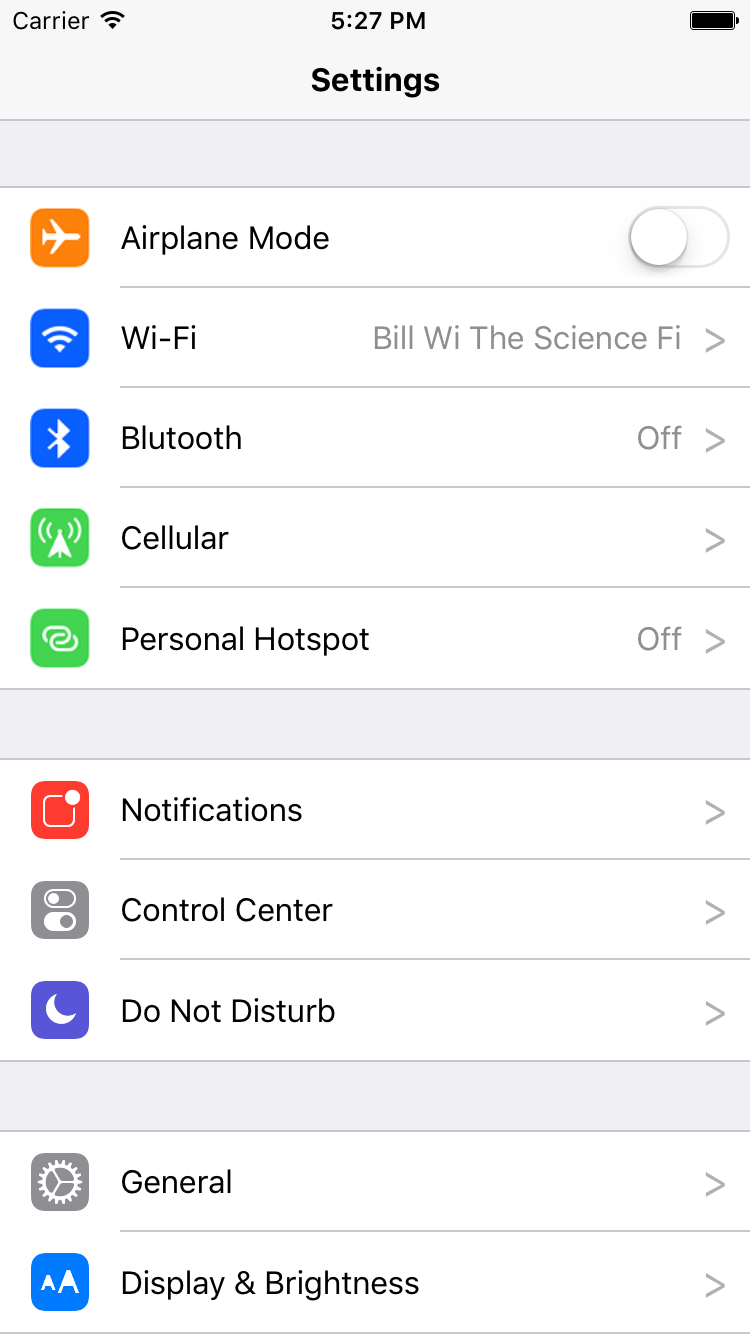
Here is an example that looks very very close to the default iPhone settings page.

The code behind this is:
constructor(){
  super();
  this.onValueChange = this.onValueChange.bind(this);
  this.state = {switchValue: false};
}
render() {
  var bgColor = '#DCE3F4';
  return (
    <View style={{backgroundColor:'#EFEFF4',flex:1}}>
      <View style={{borderBottomWidth:1, backgroundColor:'#f7f7f8',borderColor:'#c8c7cc'}}>
        <Text style={{alignSelf:'center',marginTop:30,marginBottom:10,fontWeight:'bold',fontSize:16}}>Settings</Text>
      </View>
      <View style={{backgroundColor:'#EFEFF4',flex:1}}>
        <SettingsList borderColor='#c8c7cc' defaultItemSize={50}>
          <SettingsList.Header headerStyle={{marginTop:15}}/>
          <SettingsList.Item
            icon={
                <Image style={styles.imageStyle} source={require('./images/airplane.png')}/>
            }
            hasSwitch={true}
            switchState={this.state.switchValue}
            switchOnValueChange={this.onValueChange}
            hasNavArrow={false}
            title='Airplane Mode'
          />
          <SettingsList.Item
            icon={<Image style={styles.imageStyle} source={require('./images/wifi.png')}/>}
            title='Wi-Fi'
            titleInfo='Bill Wi The Science Fi'
            titleInfoStyle={styles.titleInfoStyle}
            onPress={() => Alert.alert('Route to Wifi Page')}
          />
          <SettingsList.Item
            icon={<Image style={styles.imageStyle} source={require('./images/blutooth.png')}/>}
            title='Blutooth'
            titleInfo='Off'
            titleInfoStyle={styles.titleInfoStyle}
            onPress={() => Alert.alert('Route to Blutooth Page')}
          />
          <SettingsList.Item
            icon={<Image style={styles.imageStyle} source={require('./images/cellular.png')}/>}
            title='Cellular'
            onPress={() => Alert.alert('Route To Cellular Page')}
          />
          <SettingsList.Item
            icon={<Image style={styles.imageStyle} source={require('./images/hotspot.png')}/>}
            title='Personal Hotspot'
            titleInfo='Off'
            titleInfoStyle={styles.titleInfoStyle}
            onPress={() => Alert.alert('Route To Hotspot Page')}
          />
          <SettingsList.Header headerStyle={{marginTop:15}}/>
          <SettingsList.Item
            icon={<Image style={styles.imageStyle} source={require('./images/notifications.png')}/>}
            title='Notifications'
            onPress={() => Alert.alert('Route To Notifications Page')}
          />
          <SettingsList.Item
            icon={<Image style={styles.imageStyle} source={require('./images/control.png')}/>}
            title='Control Center'
            onPress={() => Alert.alert('Route To Control Center Page')}
          />
          <SettingsList.Item
            icon={<Image style={styles.imageStyle} source={require('./images/dnd.png')}/>}
            title='Do Not Disturb'
            onPress={() => Alert.alert('Route To Do Not Disturb Page')}
          />
          <SettingsList.Header headerStyle={{marginTop:15}}/>
          <SettingsList.Item
            icon={<Image style={styles.imageStyle} source={require('./images/general.png')}/>}
            title='General'
            onPress={() => Alert.alert('Route To General Page')}
          />
          <SettingsList.Item
            icon={<Image style={styles.imageStyle} source={require('./images/display.png')}/>}
            title='Display & Brightness'
            onPress={() => Alert.alert('Route To Display Page')}
          />
        </SettingsList>
      </View>
    </View>
  );
}
onValueChange(value){
  this.setState({switchValue: value});
}
Here is an example of the android page:

The code can be found here

